version-control
Materials originally developed for the "Version control for research" breakout session of the Best Practice for Code Archiving workshop, 11 December 2016.
Getting started with git
This section of the tutorial focuses on using git through the command line, which is an interface for sending commands directly to your computer’s operating system. On Windows computers this is the Command Prompt while on a Mac you can use Terminal. Here’s where to find these:
Windows
- Go to the Start menu
- In the Search or Run line type cmd and press enter.
Mac
- Go to Applications -> Utilities -> Terminal
How does git work?
You tell git to manage the files in your project by setting up and working within a git repository. This is simply a directory which contains some hidden files used by git for bookkeeping.
Once your repository is set up, you need to add files that you want git to manage. Git will keep track of any modifications to these files. When you have made changes to your project, you can record the changes as a commit. Each commit creates a snapshot of the project directory, allowing you to construct a record of the state of your project through time.
Setting up a git repository
To set up a local git repository, create a directory, move into it and tell git to initialise the repository. You can do all of these steps using the command line1 as follows:
mkdir myproj
cd myproj
git init
Here, mkdir and cd are UNIX commands to make a directory and
change directory respectively. Finally, git init creates the
hidden structure within the new directory that git needs to start
tracking your files.
Tell git which files you want to track
You need to tell git which files you want it to manage within the
working directory using git add. First we’ll use a line of UNIX
commands to create a file called README.md:
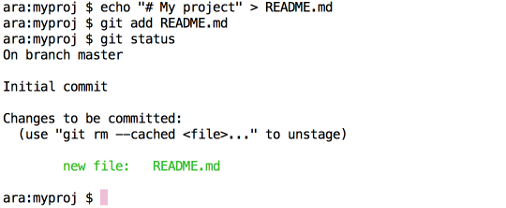
echo "# My project" > README.md
git add README.md
git add tells git to include the new file in the next commit
snapshot. This is called staging a file. git add is also used
when you want to tell git to stage files which git already knows
about.
You can use git status to produce a report about the current state
of the working directory. This will list files which contain changes
to be committed, those which contain changes that have not been
staged, and files which are not yet tracked. With the steps we’ve
taken so far the output should look something like this:
Get your project under version control
The next stage is to begin your version history by creating your first commit. This will take an initial snapshot of the files that you’ve asked git to manage and set up version control on those files.
Make a final check on the state of your working directory using git
status to make sure that you’re happy with the list of files to be
included.
For the first commit you can use git commit with the -m option,
which allows you to specify a commit message directly:
git commit -m "My first commit"
Executing this command will produce a short report about the commit.
Next: Working with version control
1If you prefer, you can set up a new
folder using the mouse/GUI, but you’ll still need to navigate to the
folder on the command line using cd.